
In Step 3.2 of this course, you will get experience receiving digital files with flamp. These files will arrive in fldigi as digital transmissions and be recognized as files intended for management by flamp. You will also learn how to report on your file reception to listening stations and to relay blocks that you receive for the benefit of stations that did not receive them. You will be receiving simulated transmissions using the Audio Playback technique that you learned in Step 1.2 of this course.
For this step, Step 3.2, please use the configuration of flamp described in Step 3.1: Download, install, and configure flamp.
Download these files, one by one, and save each of them to your workspace folder:
In this exercise, you will successfully receive a simulated digital transmission with fldigi, managed by flamp, that is formatted for display in flmsg.
Exercise configuration: Before beginning this exercise, follow the steps outlined on the Off-the-air exercise preparation page. (Using this link will open the page in a separate browser window or tab.)
Launch fldigi and flamp, if they are not already running. Click flamp's Receive tab to open it. However, if flmsg is open, close it.
Use "File|Audio|Playback" and check the checkbox. Locate and select the file to be played, D3.2.1.wav, in your workspace folder and press the Open button. You will probably want to answer the question "playback continuous loop?" with "No". The specified file will then begin playing. Un-check the box at "File|Audio|Playback" to stop playback, or allow it to continue playing to the end of the file.
As this transmission began to arrive in fldigi, its included RSID changed fldigi's operating mode to MFSK128. On the sender's side, flamp is directing fldigi to transmit an flmsg message file. flamp begins with "preamble" information. The portion of this information shown in the image at right includes the call sign and other information about the sender (from FLAMP's Configure tab) and the filename and title of the file (in this case, "ex3.2.1.p2s" and "Ajax County Disaster 528-11") from flmsg. In its SIZE line, it contains information about the file transmission that is to follow: the number of blocks to be sent ("15") and the encoding method ("64", referring to the base64 method of rendering binary content as ASCII characters). This enables flamp on the recipient's side to know what to expect.
Each line composed by flamp includes a line descriptor, a character count, a unique four-character line checksum, and a four-character file checksum for the entire file being transmitted. For example, consider these two lines:
<SIZE 15 D20A>{95D1}913 15 64
<DESC 33 BFB6>{95D1}Ajax County Disaster 528-11
The first line's line descriptor is "SIZE"; the second line's is "DESC". The first line's character count is "15"; the second line's is "33". These values are the numbers of characters in the lines beginning with the open-curly-bracket character "{". The first line's checksum is "D20A"; the second line's is "BFB6". The character count and checksum values were calculated by the sender's copy of flamp and transmitted with the file. The recipient's copy of flamp performs the same calculations of character count and checksum on each line's content, and if it arrives at different values it knows the content was not received correctly.
The file checksum, "95D1", was also calculated by the sender's copy of flamp and transmitted with the file. This value enables the recipient's copy of flamp to manage its receipt and re-assembly of multiple files in the same session, even if pieces of different files, possibly from different senders, arrive out of order.
The image at right shows fldigi's receipt of encoded and numbered blocks of the file having checksum "95D1". Here, blocks numbered 3 through 9 are arriving. Each block, on its own line, has its own character count and checksum, calculated by the sender. (Notes: that all character counts in this image are 72; this is because there are 64 characters of base64 code per line plus 8 characters of file checksum and block number string, from opening to closing bracket, as in "{95D1:4}". When the block numbers become two digits, the character counts become 73. The last block can contain fewer than 64 characters of base64 code.)

Meanwhile, as shown at right, flamp is receiving and processing lines of information from fldigi.
On flamp's Receive tab, the Receive Queue at the bottom shows that 25% of the file named "ex3.2.1.p2s" has been received, and that file is selected (highlighted). The Receive Queue can contain multiple files, and you can select one to view its information. Above, we see the information about that file that flamp has received and interpreted so far. We see its filename, description, and size in bytes. We see that it is being sent in 15 blocks. Below that, on the Missing line, we see that (as this snapshot was taken) blocks 4 through 15 are still outstanding. Below that, on the Blocks line, three consecutive blue boxes represent the successfully-received blocks 1, 2, and 3.
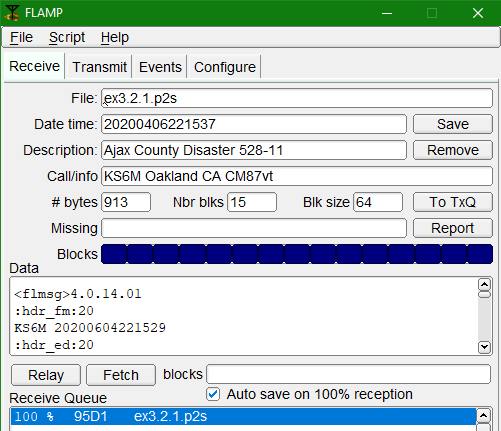
In the image at right, fldigi (not shown) has finished receiving the incoming file and flamp is displaying the successful completion. The Blocks line shows 15 consecutive blue boxes; the Missing line, just above it, is empty. The Receive Queue, at bottom, shows 100% complete. Just below the Blocks line, the Data text box is displaying the first few lines of the received file.
Because you have checked the "Auto save on 100% reception" checkbox (just above the Receive Queue), flamp has saved the received file, named "ex3.2.1.p2s", to your computer. The file will be saved to C:\\Users\your-account\NBEMS.files\FLAMP\rx\date in Windows, and to similarly-named locations in other operating systems.

Because this is an flmsg file, flmsg can display it. Unlike the situation in which fldigi receives an flmsg file without the intervention of flamp, flmsg will not automatically display a file received through flamp. To display such a file, you can use File|Open in flmsg. (You can instead use your computer's file-management application ("Windows Explorer" in Windows) to locate the received file. Open flmsg, and in flmsg, use Form|Drag-N-Drop. Drag the received file's icon into the white rectangle on the Drag-N-Drop tab and release it.) flmsg will display the received file, as shown at right.
In this exercise, you will receive a simulated digital transmission with fldigi, managed by flamp, that arrives with damage.
Exercise configuration: Before beginning this exercise, follow the steps outlined on the Off-the-air exercise preparation page. (Using this link will open the page in a separate browser window or tab.)
Launch fldigi and flamp, if they are not already running, and click flamp's Receive tab. However, if flmsg is open, close it.
Use "File|Audio|Playback" and check the checkbox. Locate and select the file to be played, D3.2.2.wav, in your workspace folder and press the Open button. You will probably want to answer the question "playback continuous loop?" with "No". The specified file will then begin playing. Un-check the box at "File|Audio|Playback" to stop playback, or allow it to continue playing to the end of the file.
As reception in fldigi begins, we see that the file being received appears similar to the one received in exercise 3.2.1, above.
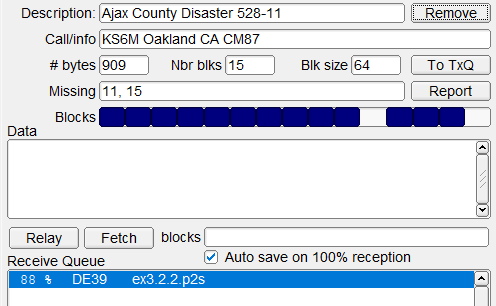
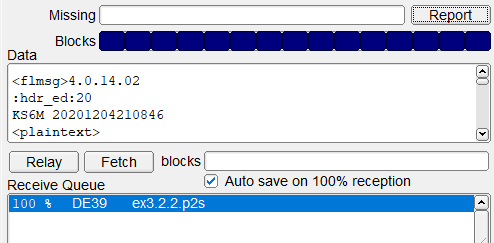
When the reception of the file is complete, however, flamp shows that two of the 15 blocks, blocks number 11 and 15, were not received correctly. In the receive queue, the reception of the file with checksum DE39 is only 88% complete.
In such a situation, the flmsg application would allow you to ignore any checksum errors and display the file as received. flamp is more strict: only 100% reception will satisfy it!
If you had received a damaged file with flmsg, your only choices would be to accept it as is or ask the sender (or another station) to re-send the entire file. flamp, though more strict, is also more nimble, as you will see in the following exercises. Leave all applications and files as they are and continue to the next exercise.
In this exercise, you will "report" on the simulated digital transmission with fldigi, managed by flamp, that you just received.
Exercise configuration: Leave all applications and files as they were at the end of the previous exercise.
flamp gives you the ability to quickly and concisely "report" on your reception of a file. You may have agreed in advance with the sending party that you will transmit your report after transmission and reception are complete. In a net setting, the Net Control Station may ask each net participant to report.
If you are asked to report, or if you have previously agreed to report, you should first consider the operating mode in which you will transmit. As previously discussed, in this course you have configured flamp (as well as flmsg) to cause fldigi to transmit in the operating mode to which fldigi is set. You will probably be expected to "report" in a specific mode, which is likely to be the mode in which your net is being conducted, or perhaps in the mode in which the Net Control Station last transmitted to you. Those receiving your report will either need already to be in the mode you choose, or you must have TxID turned on in fldigi and your recipients must have RxID turned on so your recipients will automatically switch to the mode you have chosen.
In this case, we will assume that you are expected to report in the operating mode in which you received the transmission (in fldigi) on which you are reporting. An advantage of your flamp configuration is that flamp and fldigi will do exactly that, because it is fldigi's mode setting that will be used.
Now return to flamp's Receive tab. Be sure the line for file "DE39 ex3.2.2.p2s" is selected in the Receive Queue. Press the Report button, on the right side of the Receive window about halfway down the application's window. You will see a warning panel that reads, "You are about to transmit! Continue?" Press the "Yes" button.
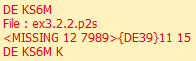
fldigi will respond by making a very brief transmission in your chosen operating mode. Your transmission identifies your station (here, "DE KS6M") and the name of the file in question ("ex3.2.2.p2s"). The next line's line descriptor is "MISSING". It reports that blocks 11 and 15 are missing from the file with checksum DE39. The last line contains "DE", your station's call sign, and "K" to indicate the end of your transmission.
If you had received the entire file successully, your report would have been "CONFIRMED" instead of "11 15". If you had failed to receive any of the first few "preamble" lines of the transmission, your report would have been "PREAMBLE". The line descriptor of the line containing your report is always "MISSING" even if nothing is missing and you report "CONFIRMED".
Leave all applications and files as they are and continue to the next exercise.
In this exercise, you will receive from the Net Control Station the two blocks, 11 and 15, that you just reported missing in Exercise 3.2.3.
Exercise configuration: Leave all applications and files as they were at the end of the previous exercise.
flamp enables any station to "fill" any other station that has reported a missing block of any file. The Net Control Station asked for your report, and you reported missing blocks 11 and 15. In this case, the Net Control Station will reply with a "fill" of your missing blocks.
Use "File|Audio|Playback" and check the checkbox. Locate and select the file to be played, D3.2.4.wav, in your workspace folder and press the Open button. You will probably want to answer the question "playback continuous loop?" with "No". The specified file will then begin playing. Un-check the box at "File|Audio|Playback" to stop playback, or allow it to continue playing to the end of the file.

fldigi displays the text it receives from the Net Control Station. Note that it contains only the two blocks of the file with checksum DE39 that you reported missing.
flamp recognizes the incoming text as "fills" of the missing blocks of the incomplete file. When your reception is complete, all 15 blue boxes are filled in and the Receive Queue shows 100% reception.
As in Exercise 3.2.1, because you have checked the "Auto save on 100% reception" checkbox (just above the Receive Queue), flamp has saved the received file, named "ex3.2.2.p2s", to your computer. The file will be saved to C:\\Users\your-account\NBEMS.files\FLAMP\rx\date in Windows, and to similarly-named locations in other operating systems.
In this exercise, you will "relay" parts of the simulated digital transmission with fldigi, managed by flamp, that you just received.
Exercise configuration: Leave all applications and files as they were at the end of the previous exercise.
flamp gives you the ability to "relay" (retransmit) part or all of a file you have received. You can "relay" any block you have received successfully even if you failed to receive other blocks. Such a request will come from another station among several with which you are in contact, and possibly from your net's Net Control Station.
Note: Re-sending blocks of a file that you have transmitted is done on the Transmit tab by specifying blocks in the blocks text box and pressing Xmit. Re-sending blocks of a file that you have received ("relaying") is done on the Receive tab by specifying blocks in the Blocks text box and pressing Relay.
If you are asked to relay, you should first consider the operating mode in which you will transmit, as in the previous exercise, and adjust your operating mode as necessary.
For this exercise, assume that you are station KS6M and that you receive the following message via fldigi, in MFSK128, from your net's Net Control Station:
KS6M please relay blocks 5 and 7 thank you de NCS
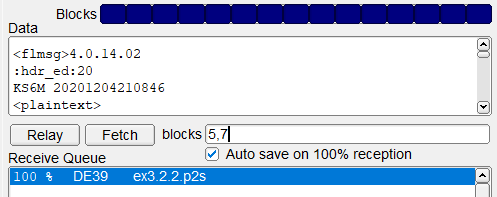
To comply with this relay request, go to flamp's Receive tab. Be sure the line for file "DE39 ex3.2.2.p2s" is selected in the Receive Queue. Above the Receive Queue text box, enter "5,7" (without the quotes) into the "blocks" text box, as shown at right. Now press the Relay button at the left side of the line containing the "blocks" text box. You will again see a warning panel that reads, "You are about to transmit! Continue?" Press the "Yes" button.
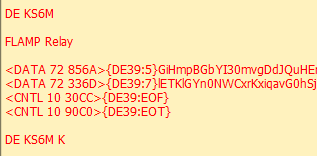
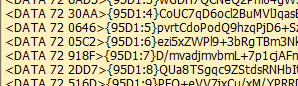
fldigi will respond by "relaying" blocks 5 and 7. Listening stations with copies of flamp that are missing either or both of those blocks can accept them. Shown at right are the left ends of the transmitted lines. Each line contains the file checksum DE39, so recipients' copies of flamp know which file is being "filled" (operators may have multiple files in their Receive Queues), as well as a line checksum so recipients' copies of flamp can confirm correct receipt of each block.
If you are asked to relay the preamble, use "0" as the block number. If you are asked to relay the entire file, delete any contents of the "blocks" text box so it is entirely blank.
In the Step 3.2 exercises above, you simulated receiving a digital file with flamp. You received a file successfully and then another file unsuccessfully. You then reported on your unsuccessful receipt, and received a "fill" of your missing blocks. Finally, you relayed two successfully-received blocks of the file, providing a "fill" for other stations that failed to receive those blocks.