
In Step 1.3 of this course, you will get experience making digital transmissions using fldigi. fldigi's File|Audio|TX generate menu item records, as a .wav-format audio file, a transmission you are merely simulating with your copy of fldigi. (It will also, however, record any real radio transmissions that you may make.) You will be asked to specify a filename and location for saving the file. The specified file will collect and save the audio from the beginning of fldigi's real or simulated transmission to the end, without dead space before or after. Un-check the box at File|Audio|TX generate when you're done.
In Step 1.3 of this course, you will simulate transmitting with fldigi, just as you simulated receiving with fldigi in the previous step, saving your simulated transmissions as files. After saving some files, you will use the skill you learned in the previous step to simulate receiving the transmissions that you just simulated sending.
In this exercise, you will simulate a transmission of a paragraph of text. Though it won't go out over the air, it's time to bring your good ham radio practices into fldigi. As with ham radio voice, you will end your fldigi transmission with your call sign. If you have no call sign, use "XXXXXX" in these exercises.
Exercise configuration: Before beginning this exercise, follow the steps outlined on the Off-the-air exercise preparation page. (Using this link will open the page in a separate browser window or tab.)
Use File|Audio|TX generate and check the checkbox. (See NBEMS menus and configuration for help with the "W|X" and "Y~Z" method of describing software menus and configuration.) fldigi will ask you to name your output file and decide where to put it. Here, I suggest placing your file in your workspace folder (and I suggested you create that folder in C:\\Users\your-account\ and that you name it "fldigi.learn"), but you can put it anywhere you like. You'll be creating many output files, so I suggest you name them in a way that helps you remember what they are. Here, in Exercise 1.3.1, I suggest naming your file "ex1.3.1a.wav". (If you decide to create more than one output file in any exercise, you can change the letter to the left of the dot from a to b, c, etc.)
Follow these instructions:
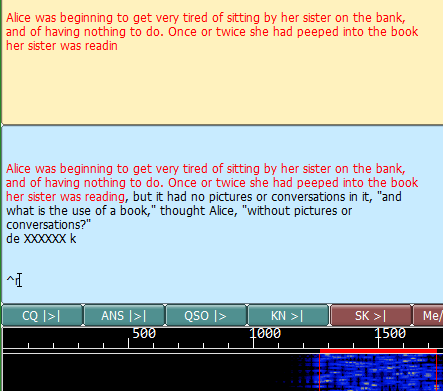
Alice was beginning to get very tired of sitting by her sister on the bank,
and of having nothing to do. Once or twice she had peeped into the book
her sister was reading, but it had no pictures or conversations in it, "and
what is the use of a book," thought Alice, "without pictures or
conversations?"
Your transmit pane should appear as shown at right. Notice that the text you inserted is black. Notice the insertion cursor "I" just to the right of the "^r" characters. You should also see that there is no text in the receive pane.
The blank lines before and after your text are a courtesy to those receiving your message. They ensure that at least one blank line separates your transmission from whatever appears above it in their receive panes, and likewise at the end.
Now right-click in the transmit pane and select Transmit from the choices offered.
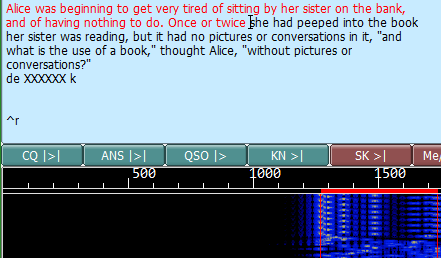
fldigi will begin transmitting. You should begin to see your signal in the waterfall pane, and at the same time you will see the text you inserted into the transmit pane turn from black to red as it is transmitted and that same text begin to appear in the receive pane. See the image at right.
When fldigi reaches the end of your transmitted text, it will delete your text from the transmit pane. It will stop transmitting and return to receive mode, but only because you inserted the "^r" characters at the end of your text. If you omit those characters, fldigi will remain in transmit mode, transmitting "idle tones".
If for any reason fldigi remains in transmit mode after all text is transmitted, or if for any reason you want to stop transmitting immediately, you can manually take fldigi out of transmit mode and return it to receive mode in two ways:
Now use File|Audio|TX generate and UNcheck the checkbox.
You have just seen what it is like to transmit a paragraph of text. If all went well, you now have a file named "ex03-01a.wav" in your workspace folder. Use the skills you learned in Step 1.2 to play back this file, so you can see what it is like to be on the receiving end of that transmission.
In this exercise, you will again simulate a transmission of a paragraph of text. This time, though, you will (oops!) leave your insertion cursor in the middle of the paragraph. This will happen to you now and then, so it's good to learn how to handle it.
Exercise configuration: Before beginning this exercise, follow the instructions outlined on the Off-the-air exercise preparation page. (Using this link will open the page in a separate browser window or tab.)
Use File|Audio|TX generate and check the checkbox. fldigi will ask you to name your output file and decide where to put it. Place it in your workspace folder and name it "ex1.3.2a.wav". (If you decide to create more than one output file in any exercise, you can change the last letter from a to b, c, etc.)
Follow these instructions, which are almost the same as those in the previous exercise:
Alice was beginning to get very tired of sitting by her sister on the bank,
and of having nothing to do. Once or twice she had peeped into the book
her sister was reading, but it had no pictures or conversations in it, "and
what is the use of a book," thought Alice, "without pictures or
conversations?"

Your transmit pane should appear as shown at right. Notice the insertion cursor "I" just to the right of the words "Once or twice" in the second line.
Now right-click in the transmit pane and select Transmit from the choices offered.
fldigi will begin transmitting. You should begin to see your signal in the waterfall pane, and at the same time you will see the text you inserted into the transmit pane turn from black to red as it is transmitted and that same text begin to appear in the receive pane. This time, however, transmission will halt when the insertion cursor is reached. fldigi will remain in transmit mode, sending "idle tones", but no more of your text is being sent.
This feature can be useful, but if you do it accidentally, it can be embarrassing! Why has fldigi stopped sending my text? Fortunately, if you recognize what has happened, the solution is simple: just left-click in the transmit pane to the right of, or below, the characters "^r" at the bottom of your pasted text in the transmit pane. (If those characters aren't there, left-click below or to the right of the end of your text.) Transmission or your text will resume immediately! You can now type "^r" at the end of your text if those characters aren't there.
Now use File|Audio|TX generate and UNcheck the checkbox.
You have just seen what it is like to transmit a paragraph of text with the insertion point left within the text. If all went well, you now have a file named "ex03-02a.wav" in your workspace folder. Use the skills you learned in Step 1.2 to play back this file, so you can see what it is like to be on the receiving end of that transmission.
In this exercise, you will simulate the transmission of text as you are actively typing it into the transmit pane. This skill is frequently used on the air, as it corresponds well with chatting on a voice channel and with participating in some nets. You will demonstrate the insertion of blank lines, as you would use to form paragraphs, and the use of the backspace key to delete "typos" just after you make them. As with ham radio voice, you will end your simulated fldigi transmission with your call sign.
If you would like to see this exercise demonstrated before you do it yourself, download the file named D1.3.3.wav to your workspace folder, then use File|Audio|Playback to play it. You will see what a recipient would see in the receive pane, but not what the sender would see in the transmit pane.
Exercise configuration: Before beginning this exercise, follow the steps outlined on the Off-the-air exercise preparation page. (Using this link will open the page in a separate browser window or tab.)
Use File|Audio|TX generate and check the checkbox. fldigi will ask you to name your output file and decide where to put it. Place it in your workspace folder and name it "ex1.3.3a.wav". (If you decide to create more than one output file in any exercise, you can change the last letter from a to b, c, etc.)
Follow these instructions:
Now use File|Audio|TX generate and UNcheck the checkbox.
You have just seen what it is like to transmit text as you are typing it. You have seen that you can backspace over typographical errors and that you can insert paragraph breaks. If all went well, you now have a file named "ex1.3.3a.wav" in your workspace folder. Use the skills you learned in Step 1.2 to play back this file, so you can see what it is like to be on the receiving end of that transmission.
In the exercises above, Using fldigi's TX Generate control, you have used fldigi to record audio files of your own simulated over-the-air fldigi transmissions. Transmitting is more complicated than receiving, but you have learned the basics and know enough to manage a real over-the-air contact. There are many more things you can do with fldigi. You will learn to use them as you discover them in the application or as you see others using them over the air.